 Gookit
Use Gookit Label API to turn product data and a saved template into a label PDF. Each record supplies the label fields and the number of copies you need.
This guide walks through creating a template, submitting a batch, checking its status, and downloading the PDF. Start with two product records so you can check the layout and copy counts before using your own data.
What you will generate
The example uses a 50 × 30 mm label with a product name, a Code 128 barcode, and a readable SKU below it.
| Product | SKU encoded in the barcode | Copies |
|---|---|---|
| Trail Bottle | TB-1042 | 2 |
| Desk Tray | DT-2006 | 1 |
The result is three labels in one PDF. This example uses a ROLL template, which puts one label on each page, so it produces three nominal 50 × 30 mm pages. The renderer rounds these to 142 × 85 PDF points (about 50.09 × 29.99 mm). A sheet template can put several labels on one page; its page count will differ.
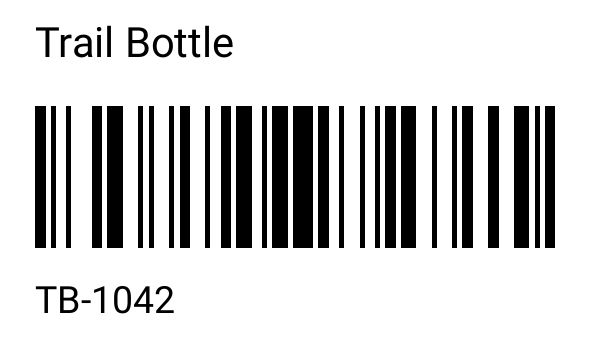
Trail Bottle 2 copies
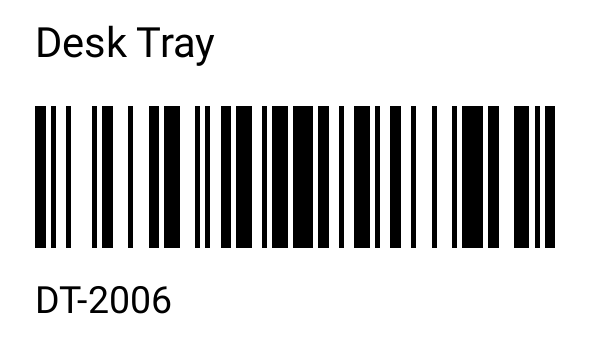
Desk Tray 1 copy
Sample output generated through Gookit Label API. Three pages, one label per page.
Download the three-label PDF ↓This sample was generated through Gookit Label API on September 20, 2026 using the template and records below. We verified template creation, batch submission, status checks, and PDF download, then decoded the barcodes on all three pages. Test the output with your own printer and label stock before production use.
The API produces the file. Your application or print workflow handles sending it to a printer.
Before you begin
This walkthrough uses the independent developer-account path. You need:
- A Gookit developer account and a developer API key from Settings → API Keys.
- Available output allowance on that account. PDF generation uses your account’s allowance; check the current API plan details.
- A Bash or Zsh terminal,
curl7.76 or newer, andjqfor reading and building JSON. - A PDF viewer to check the output.
Already using BarcodeMan? Start with the API access guide to choose your entry path. This example uses a gkdev_ developer key. A Shopify merchant’s gkapp_ key belongs to a separate access path; do not assume the accounts or their saved templates are interchangeable.
Run the commands in the same terminal and a new working folder. Replace the placeholder with your developer key locally; keep the key out of shared files and browser code.
export GOOKIT_API_KEY="YOUR_DEVELOPER_API_KEY"If a command reports an error, stop and resolve it before continuing. The commands save responses to local files so you can inspect them without resubmitting a job.
1. Create a reusable label template
The template defines the size and layout. Its field values connect each element to a key in your product data: name supplies the product name, and sku supplies both the barcode and the readable SKU.
Save this as template.json:
{ "name": "First batch: 50 x 30 mm product label", "template": { "unit": "mm", "type": "ROLL", "width": 50, "height": 30, "elements": [ { "type": "text", "x": 3, "y": 2, "width": 44, "height": 5, "rotation": 0, "field": "name", "fontSize": 10 }, { "type": "barcode", "x": 3, "y": 9, "width": 44, "height": 12, "rotation": 0, "field": "sku", "barcodeType": "code128", "showBarcodeText": false }, { "type": "text", "x": 3, "y": 24, "width": 44, "height": 4, "rotation": 0, "field": "sku", "fontSize": 9 } ] }}Create the template:
curl --fail-with-body --silent --show-error --max-time 30 \ https://label-api.gookit.co/api/v1/templates \ -H "Authorization: Bearer $GOOKIT_API_KEY" \ -H "Content-Type: application/json" \ --data-binary @template.json \ --output template-response.jsonOn success, the API returns HTTP 201 and an id. Read that ID into a variable:
TEMPLATE_ID=$(jq -er '.id | select(type == "string" and length > 0)' template-response.json)Keep this ID for later batches. You can send different product data against the same template without creating the layout again. If you prefer a visual editor, open the Label Editor under the same developer account.
2. Send the product data and copy counts
Create batch.json with the saved template ID:
jq -n --arg templateId "$TEMPLATE_ID" '{ templateId: $templateId, items: [ { quantity: 2, data: {name: "Trail Bottle", sku: "TB-1042"} }, { quantity: 1, data: {name: "Desk Tray", sku: "DT-2006"} } ]}' > batch.jsonquantity sets the number of copies for each record. These two records request 2 + 1 = 3 labels. Keep SKU values as strings so values with leading zeros remain intact.
Submit the batch once:
curl --fail-with-body --silent --show-error --max-time 30 \ https://label-api.gookit.co/api/v1/print \ -H "Authorization: Bearer $GOOKIT_API_KEY" \ -H "Content-Type: application/json" \ --data-binary @batch.json \ --output print-response.jsonA successful submission returns HTTP 202 and a jobId. Save it:
JOB_ID=$(jq -er '.jobId | select(type == "string" and length > 0)' print-response.json)Accepted does not mean finished. The PDF is generated in the background. Use this job ID to check progress; sending POST /print again creates another production job.
If submission times out, the server may still have accepted it. Do not automatically repeat the request. Preserve any response you received and investigate whether the job was created before deciding to submit again.
3. Check whether the PDF is ready
Request the status using the same key:
curl --fail-with-body --silent --show-error --max-time 30 \ "https://label-api.gookit.co/api/v1/print/$JOB_ID" \ -H "Authorization: Bearer $GOOKIT_API_KEY" \ --dump-header job-headers.txt \ --output job-response.jsonAfter a successful response, inspect the status:
jq '{status, error}' job-response.json| Status | Next action |
|---|---|
pending | Wait, then check this job again |
processing | Wait, then check this job again |
completed | Continue to the download step |
failed | Stop checking and inspect error in the response |
For this manual walkthrough, wait about two seconds between checks and stop after roughly two minutes if the job has not reached a terminal state. Keep the job ID for investigation. This is an example waiting policy, not an API completion-time guarantee; stopping your checks does not cancel the job.
If a status request returns HTTP 429, read Retry-After in job-headers.txt and wait that many seconds before checking again. If the wait exceeds your chosen deadline, stop rather than starting a new batch.
4. Download and check the PDF
Only continue when the saved response says completed. Extract its download URL:
PDF_URL=$(jq -er 'select(.status == "completed") | .url | select(type == "string" and length > 0)' job-response.json)If that command fails, return to the status step. Otherwise, download the file:
curl --fail --silent --show-error --location --max-time 60 \ "$PDF_URL" \ --output labels.pdfThe download uses the returned URL; do not add your API key to this storage request. The API reference describes the URL as temporary, approximately 24 hours. Save the file in your own storage if you need it later.
Open labels.pdf and check:
- It contains three pages for this nominal 50 × 30 mm
ROLLtemplate. The sample page box is 142 × 85 PDF points. - Trail Bottle appears twice and Desk Tray appears once.
- The names and readable SKUs match the input data, with no clipped text.
- The barcodes encode
TB-1042andDT-2006respectively.
Before printing a larger batch, test the file on matching stock at 100% / Actual Size and scan the printed barcodes. Changing the label size or fitting the PDF to a different paper size changes the physical barcode dimensions.
If your first batch fails
Use the HTTP status and response body to choose what to fix:
| Signal | What to do |
|---|---|
400 | Correct the request fields or template definition before trying again |
401 | Check your developer key and authorization header |
402 | Check the account’s remaining output allowance or active plan |
404 when submitting | Check the template ID and the account that owns it |
404 when checking status | Stop checking; the job may be missing or expired |
422 when submitting | Repair the saved template before creating a print job |
429 | Wait for the response’s Retry-After interval |
Job status failed | Read the returned error and correct the cause before starting another job |
A PNG preview from /render is useful for inspecting one label. A successful preview does not confirm that the complete PDF batch has finished.
Use the same template for your own data
Replace the two example records with your product data, keeping the name, sku, and quantity fields. Check the full label count before submission: it is the sum of all quantities, not the number of records.
The API reference checked on September 20, 2026 documents a maximum of 1,000 labels per job, 1,000 labels per minute per key, and 120 requests per minute per key. Recheck the current limits before increasing batch size or automating status checks.
Your system chooses the records and copy counts. Gookit Label API applies the saved template and returns the PDF for your print workflow.
Read the API setup guide to choose your access path and prepare your first batch. For product scope and plan information, see Gookit Label API.
Run the same batch with Node.js or Python
If your application uses Node.js or Python, use these small server-side clients with the same batch.json and saved template ID. Node.js requires version 22 or newer; Python requires 3.10 or newer and uses only the standard library. Both clients were exercised against the live API with this three-label fixture.
Set GOOKIT_API_KEY in your terminal as described above, then choose one client:
node labels.mjs submit batch.json labels.pdf# Python alternative:# python3 labels.py submit batch.json labels.pdfThe clients save labels.pdf.job.json after acceptance. If polling or download stops, resume the saved job instead of submitting the batch again:
node labels.mjs resume labels.pdf.job.json labels.pdf# Python alternative:# python3 labels.py resume labels.pdf.job.json labels.pdfEach submit run is a new request. Use a different output filename for a different batch if you need to retain both job records. If acceptance succeeded but writing the job file failed, preserve any response and investigate before another submission.